Comenzando con su Sitio Web Compartido
¡Queremos felicitarlo por emprender su propio negocio en línea y agradecer que justamente para esa tarea haya elegido a HostingKings!
Para el alojamiento del sitio web propio y cuentas de email usted debe comprar alguno de nuestros Planes de Alojamiento. Puede aprender como comprar en nuestro sitio con la guía de ayuda que le permitirá hacerlo rapidamente.
Una vez que su orden se haya completado puede llevarnos hasta una hora en raros casos un poco más para que la cuenta de alojamiento sea activada por nuestro departamento de facturación, esto debido a varios controles manuales que se realizan antes de la activación. Al momento que su cuenta sea activada, usted recibirá un email de nosotros con las credenciales para acceder al Panel de Control de su cuenta.
El email lleva como asunto “Guía de Bienvenida de HostingKings para sudominio.com”. En algunas ocasiones este email va a parar a la carpeta de correo basura por lo que rogamos revisar en esa carpeta además de aquella donde recibe su email.
Ahora vamos a hacer una recorrida para mostrar a usted los pasos que debe dar para crear con éxito su sitio web:
1) ACTUALIZAR LOS REGISTROS DNS
La primera tarea que debe realizar es tener a seguro que su dominio apunta a los servidores de nombre de nuestro alojamiento, de forma tal que resuelva sobre su cuenta en el servidor.
Nota: para aquellos dominios nuevos que son registrados junto con la compra del paquete de alojamiento los servidores de nombre los actualizamos automáticamente.
Si usted tiene un dominio existente con HostingKings u otro registrar, deberá actualizar los servidores de nombre manualmente. Recomendamos que haga esto inmediatamente después de la compra del plan de hosting ya que cuando usted cambia los servidores de nombre para su nombre de dominio, estos cambios no son vistos de inmediato en todo el mundo. Va a tomar hasta 24 horas (raras veces un poco más) para que los servicios ISP actualicen el cache de sus DNS de forma que todos puedan ver a su sitio web en el explorador. Este proceso usualmente se lo llama propagación de DNS.
Desafortunadamente, este proceso no puede ser influenciado ni acelerado por ningún método ya que se realiza en forma automática.
Sugerimos utilizar alguno de los enlaces de abajo para observar si la propagación se ha completado para su dominio:
http://checkdnspropagation.com/
http://propagatedyet.com/
Si su dominio está registrado con HostingKings, puede facilmente actualizar sus servidores de DNS dirigiéndolos a su servidor actuando en su cuenta de HostingKings de la siguiente forma:
- Ingrese en su cuenta de HostingKings
- Seleccione la opción Manage Domains del menú desplegable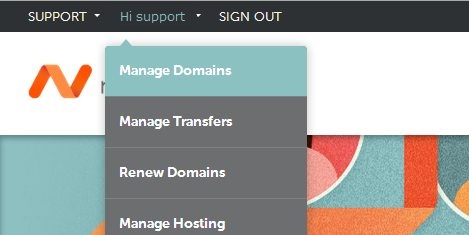
- Haga click en el nombre de dominio al cual quiere cambiar la configuración
- Seleccion Transfer DNS to Webhost (or Domain Name Server Setup)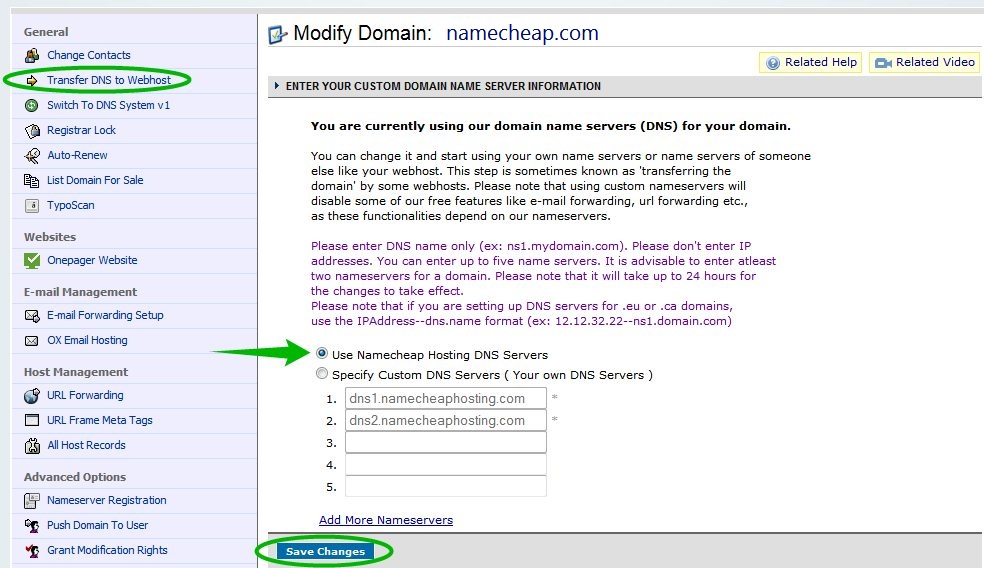
- Select Use Namecheap Hosting DNS Servers option and click on SAVE CHANGES.
Si su dominio está registrado con otro registrar, necesitara cambiar los servidores de nombres por el lado de ellos.
Nuestros servidores de nombre son los siguientes:
ns1.hostingkings.com
ns2.hostingkings.com
Mientras su dominio este en el proceso de propagación ( y su cuenta ya este activada y usted ha recibido su email de bienvenida con las credenciales para ingresar al Panel de Control Cpanel ), usted va a tener que utilizar el enlace provisto en el email de bienvenida para poder ingresar a su cuenta en el cPanel: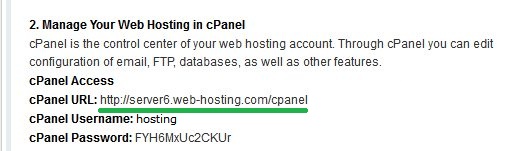
2) CREANDO UN SITIO WEB CON EL AUTOINSTALADOR SOFTACULOUS
It can happen that you do not have any content yet for your web-site, and no development skills to create one, though you desire to build your web-site yourself. It is possible and very easy to create a site with Softaculous auto-installer in cPanel. It contains up to 200 scripts that allow you to create a web-site with user-friendly graphics-based interface.
Please, find the list of scripts here. 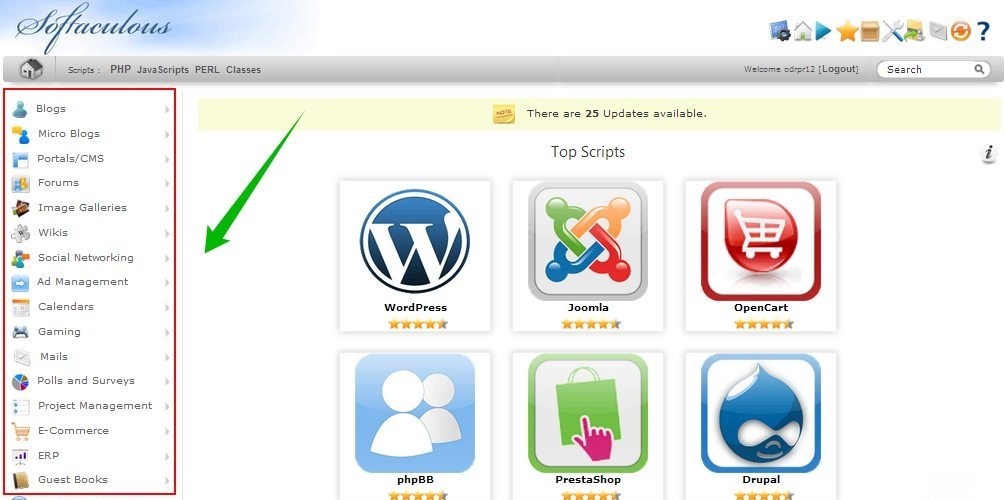
Here is the video that will help you to choose the most convenient script for you.
Once you choose one, it is high time to get to the installation. The process is very easy and usually takes a couple of minutes and our tutorials on installing scripts via Softaculous can guide you though the installation steps.
3) USING FTP
If you have the content for your web-site stored on your local PC, you can upload it via FTP ( using any FTP client, like FileZilla, CyberDuck, iWeb etc ) or using File Manager in cPanel. If you choose an FTP client, please, refer to the following web-tutorial, that will help you to upload the content correctly.
Please, make sure you are using the following settings in your FTP client:
1. server name ( host name ): the name of the server that your account is located on ( to find it out you can also refer to this manual) or to your welcome e-mail.
There can be a server hostname or IP address: 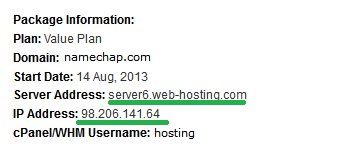
2. username: your cPanel username
3. password: your cPanel password
4. port: 21 (or 21098 for SFTP connection)
5. mode: passive
File Manager is a web-based FTP client integrated in cPanel. You can upload the content, create new files and folders, edit the code on your pages ( using Simple Code Editor ) and move your files between the folders using it.
We have How to use the file manager tutorial for you, to help you to learn to manage your content in File Manage.
4) CHECKING THE SITE DURING DNS PROPAGATION
Now it is all set up and you want to check the look of your web-site, but it may happen that your domain is still in DNS propagation state and you can't see the content of the site in the browser.
We suggest editing the 'hosts' file to check the site during DNS propagation process, because this method allows you to check your site's look by simply typing its name in the browser. When the file is modified, this doesn't influence your domain's DNS zone and all the users on the web continue to see the site from your old server. You, however, will not need to wait for the DNS propagation and all the changes will be instantly applied. To set the file up, please perform the following steps:
If you use Windows:
- It is recommended to close the browser before performing the change;
- Please open the folder C:\Windows\System32\drivers\etc;
- Double-click on the 'hosts' file and choose the Notepad from the list of available software;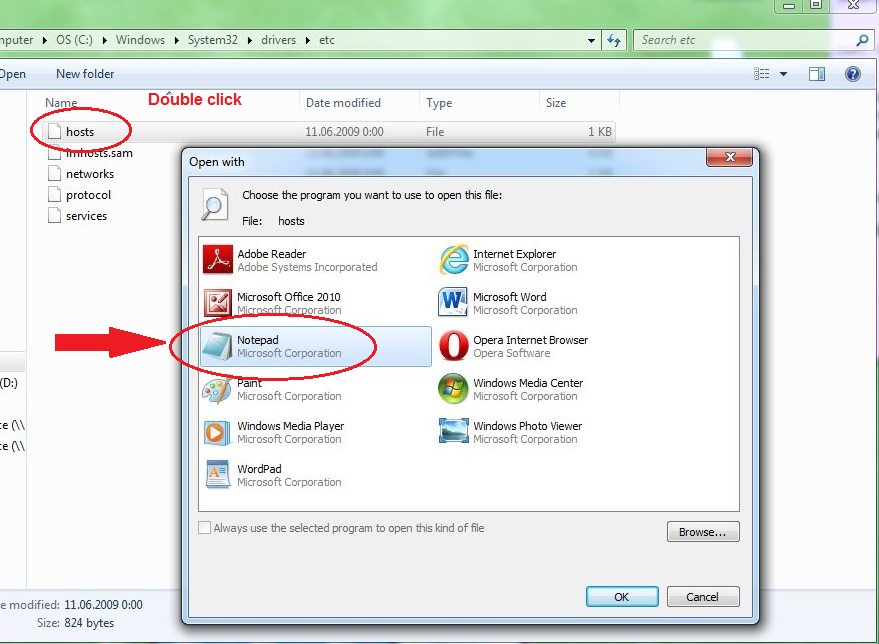
- Input the following string in the end of the document:
IP_address domain_name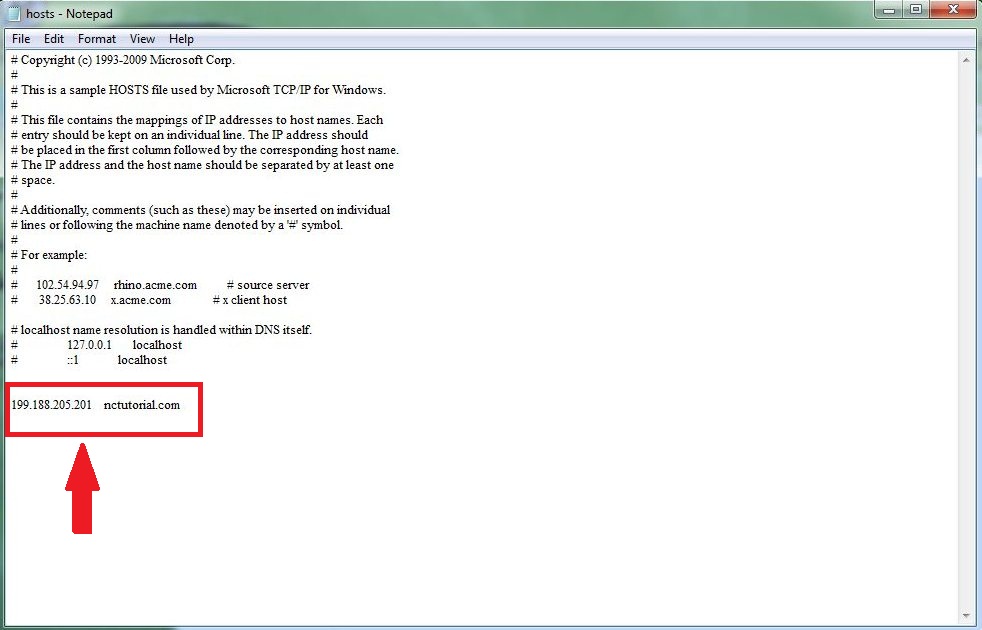
- Save the file and re-open your domain name in the browser.
If you are using Mac OS:
- Open the Terminal.app, either by start typing Terminal on the Spotlight, or by going into Applications -> Utilities -> Terminal;
- Open the hosts by typing on the Terminal that you have just opened:
sudo nano /private/etc/hosts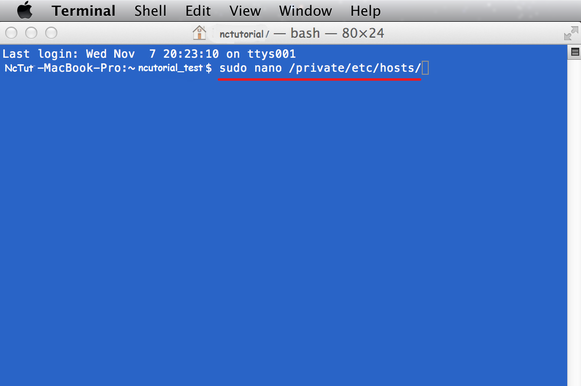
Type your user password when prompted;
- Edit the hosts file appending your new mappings underneath the default ones:
IP_address domain_name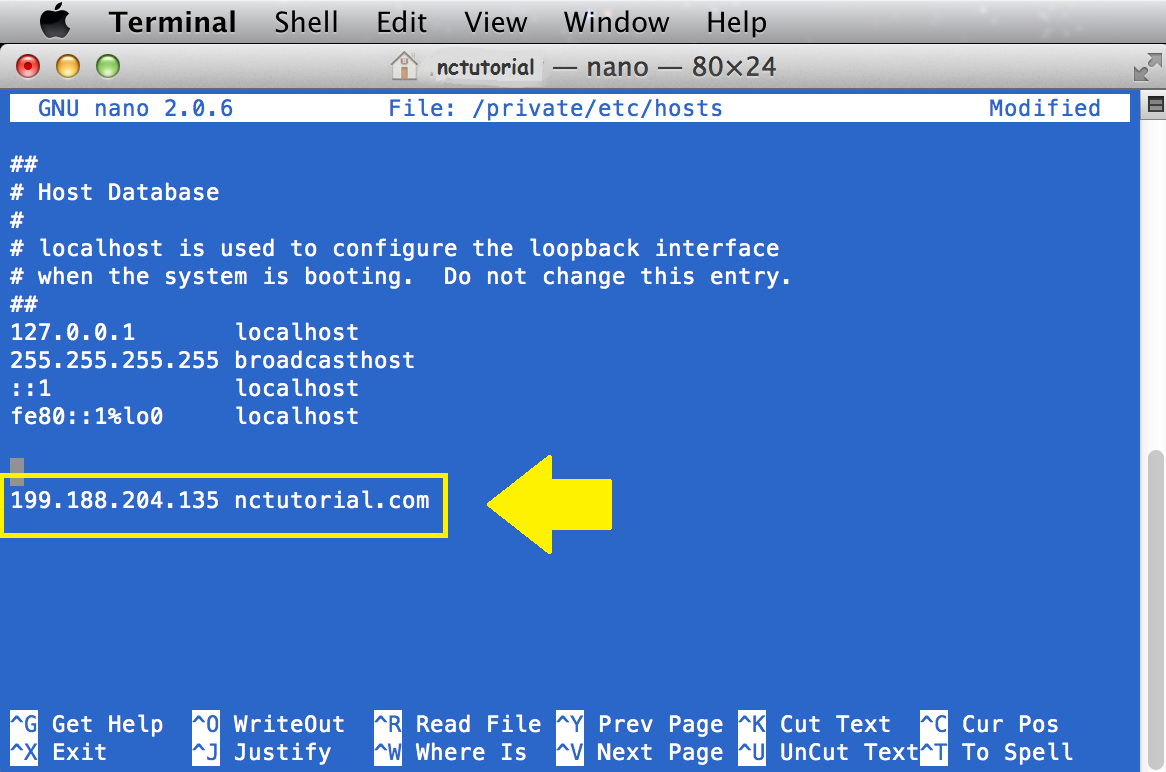
Or edit one of the default values if you know what you are doing!
- Save the hosts file (when done editing the hosts file, press CTRL+O to save the file.
Press Enter on the filename prompt, and Ctrl+X to exit the editor. );
- Flush the DNS cache ( you can issue a simple Terminal command to flush the DNS cache, and have your host file changes to take immediate effect: dscacheutil -flushcache ).
Another way to check your web-site without changing DNS records is creating a subdomain in your current hosting account.
To do this you should:
1. Create a subdomain for your domain at our server cPanel -> Subdomains -> Create a Subdomain (test.example.com for example)
Please note, that you can point your subdomain to public_html directory and it will show all content from your public_html folder 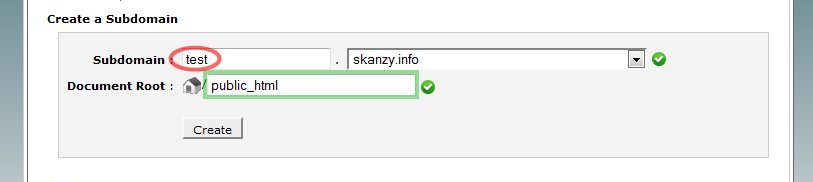
2. Create same subdomain (test.example.com ) in your active DNS zone and point it to our server's IP address.
And now after about 30 minutes ( this is how long it takes for this records to propagate ), you can open this subdomain in your browser or using proxy services ( for instance this one )
After following all these steps you will have a ready web-site that you can show to the whole world!
Should any difficulties appear, please, do not hesitate to contact us via our HelpDesk.
Our operators are always there to help you!
